Session 3: Flask - using Python & HTML together (Part 1)
Linking together the back-end with the front-end
Where can I find the material?
You can find all the slides, links to the curriculum, and to the GitHub repository at:Feedback - post-it notes
Throughout the session, put up your:
- Green post-it if you're following everything
- Red post-it if you're lost/need help
At the end, write at least one good and bad things about the session on the post-it notes!
Bonus exercises!
If at any point during this session you are finished with the live coding exercises we are doing...
... then check out the bonus exercises linked in each section.
What am I going to learn today?

Pretty much all of this!
What am I going to learn today?
- The basics of working with a dictionary
- What happens when we visit a web page in our browser?
-
Using Flask to:
- Start a web server to run a website/web app
- Control exactly how a web server behaves when we access the app over a certain URL
- Using HTML/CSS together with Flask!
Recap: Functions
- A function is a named block of reusable code.
- A function can have no arguments...
- ... or it can take any number of arguments, which goes inside the brackets () when we define our function.
- A function may optionally return some information
- This could be some value, or some results directly from another function!
Some words of caution about functions...
Be careful not to overwrite built-in Python functions like print!i.e. Don't do this!
Create a file named session2_recap.py and enter the following:
It should print Hello world! followed by
9 on the next line.
Recap: Lists
- Lists are an ordered collection of items
- List items go between square brackets [ ]
- We can put any items in a list, each of which is separated by a comma
- The first item starts at position (index) 0!
Replace the content of session2_recap.py with the following:
It should print The second instructor in the list is Kat.
Recap: For loops
Commonly used to go through each item in a collection of items, such as a list or a dictionary.
Since we saw how to loop through a list last time, for completeness, let's see an example on how to loop through a dictionary...
What is a dictionary?
It is a data structure where each value in it is linked to a key.
Replace the content of session2_recap.py with the following:
It should print The instructor's name is Darren. followed by
The instructor's favourite language is Python.
Recap: Logic
- Logic allows our program to make decisions based on given conditions.
- A condition tests whether something is True or not
Let's see our final recap example before moving on...
Replace the content of session2_recap.py with the following:
It should print Drink responsibly (if you must)!
And now...
...that you know some Python, for the rest of the course, we will take a look at specific things we can do with it!
Specifically, in the next two sessions, we'll be looking at how to have more control of the back-end using Flask!
A detour...
Before we cover Flask in more details, there are some important concepts we need to go through first, such as...
- What's a server, and why do we need it?
- What happens when we visit a web page in our browser?
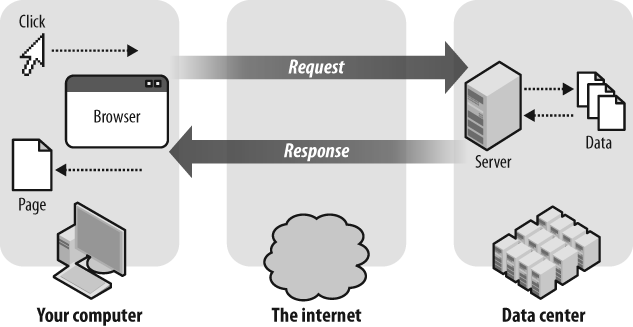
Why do we need/use a (web) server?
A server is used so we can share our web application with the world over some network.
But... how does it help make our application accessible over the Internet?
To understand that, we need to take a look at what actually happens when we try to access our application through our browser.
https://google.com
<!DOCTYPE html>
<html>...</html>
- When we type in a web address (URL) in our browser, we are in fact sending a request to the server running the website we want to visit
- Based on the URL we typed in, the server uses this information to generate the correct HTML page to send back as a response.
- Our browser then processes the received HTML, along with any CSS and JavaScript on the page, and renders out the pretty web pages that we see!
If you did the Beginners course...
Your pretty HTML pages are actually being run (served) over the GitHub server, which is what allowed you to see your projects publicly online!
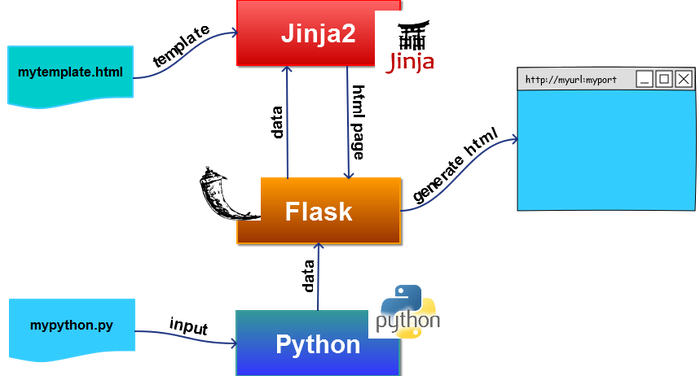
What is Flask?
- Flask is a framework - a set of code written by some other clever people that we can re-use
- It's better to use Flask to handle the requests and responses we talked about earlier, rather than writing our own, since it's quite complicated!
- Re-using Flask's code allows us to jump straight into designing and building our applications!
So... how does Flask work?
- When we first start a Flask program, it starts up a web server which we have control over using Python.
- We can then access our website in our browser!
- Instead of returning some HTML directly, Flask builds up the response HTML using something called a template engine.
- This allows HTML to be generated dynamically rather than having to write them all in full in advance (more details next session)!
Task: create a Flask git repository
Before we begin with our first Flask app, we'll set up a new git repository together to make sure your app has the right folder structure that can be used for your competition entry.
We'll be following the same steps on how to create and clone your repository as covered in the Collaborating with GitHub slides.
As a reminder, here are the steps to follow for this task:
- Name your repository "cfg-python-project-" + your initial on GitHub.
- Clone your repository using GitKraken to a folder you can easily find on your computer.
3. Inside the repo folder, create more files and folders using your text editor (see next two slides for more info) until it has the following folder structure:
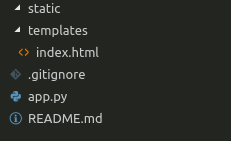
It's very important you name the folders exactly the way they are shown in this diagram!
Already done? Here are some additional exercises for you to do!
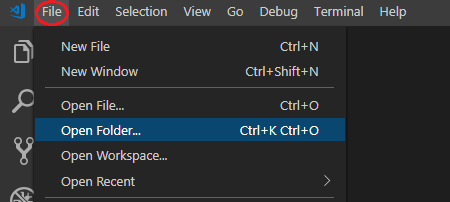
Creating new files and folders in the repo
The easiest way to create the files and folders is to have the repo folder opened in your text editor.
Your text editor also provides a more reliable way to check that your repository has all the required files and folders.
This is because files beginning with a dot
(such as .gitignore) doesn't show up (correctly) when viewed through
File Explorer/Finder.
Creating new files and folders in the repo

Flask app folder structure
- templates (folder) - HTML (template) files go in here
- static (folder) - everything else (CSS, JavaScript, images etc) go in here
- app.py (file) - the file containing the Python code that uses Flask to start up a server
- README.md (file) - a text file describing what the repo is about, with instructions on how to run the code for others who may be interested in working on the project.
- .gitignore (file) - a text file listing files/folders containing secrets we don't want to commit to Git.
In the templates/index.html file, put in some bare minimal HTML like the following (so we can push this to GitHub later):
Task: our first Flask program
Then, start the app by the usual drift: cd to change your terminal
into the repo folder, then type
python app.py
If you get that, great! Let's commit and push this to the git repo we just made together...
... then we'll dissect what all of that code did.
Already done? Here are some additional exercises for you to do!
🤔 Our first Flask app: what's happening?
First of all, check that you can see hello world! by typing
localhost:5000 in your web browser.
Since Flask is an external library, we have to import it first before we can use it.
The next line creates a new copy of a Flask app that we can then work with.
The @app.route("/") line (which has to be above a function definition)
decorates our normal Python
function so that it's capable of responding to our request at
localhost:5000
The final app.run(debug=True) line starts up a web server
controllable by Flask each time we type python app.py in the
terminal.
Including the debug=True part in the function call tells Flask to
automatically restart the program each time we made changes to our Python code.
What happens if...
... we visit some random URL, like localhost:5000/qwerty?
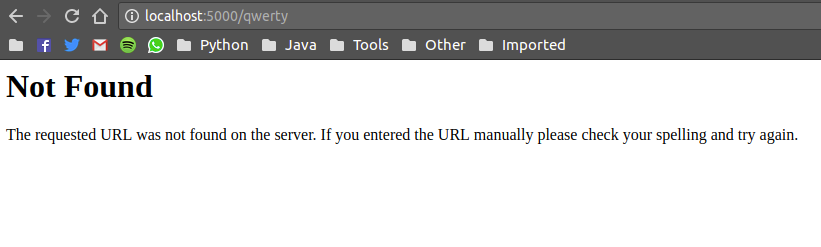
We got a Not Found error as we haven't specified in our
code on how to respond to localhost:5000/qwerty.
But we haven't written in localhost:5000 anywhere in our code,
so why did that work?
That's because Flask uses relative URLs, and by default runs (hosts)
the app at localhost under port 5000.
This means the "/"
in app.route("/") translates to localhost:5000/!
If there's nothing after the first single slash, most browsers (confusingly!) hide them by default - i.e.
localhost:5000 is the same as
localhost:5000/!
Routing
Flask uses relative URL so our app will work in a consistent way, no matter where it's being hosted.
To find out the relative URL of a web address, look out for the value after the first single slash including the slash itself.
For example, the relative URL localhost:5000/qwerty is
/qwerty.
To stop Flask returning the Not Found error we saw earlier,
we need a function with @app.route("/qwerty")
above it so Flask knows how to respond when a user visits that particular URL.
See bonus exercises 1 on how to write a catch-all
@app.route to accept
any value (except slash) after the first slash!
Returning HTML pages
So far, we've been returning simple text as response to the browser when we visit our Flask app.
But that's not very good when we want to display complex web pages.
We need a way to return the pages in HTML instead, as you know them from the beginner's course!
Save the file, go to localhost:5000 again and you should see
a larger "Hello world!" coming from the HTML we made earlier!
If you're using Chrome, you might have to press Ctrl/Cmd + Shift + R to do a "hard refresh" before you see the changes!
Snazzing up the page with CSS
Apart from seeing a larger "Hello world", the HTML page still looks no different from our simple text response...
So let's glam it up a bit by changing the font...
...and just to show CSS works, we'll turn the page pink!
Create a new CSS file called app.css inside the static folder, then put in something like this in the CSS file:
head tag in
templates/index.html, add in the following line:
The url_for function comes from Flask: it ensures
full URLs to resources (CSS, JavaScript) to always be
generated correctly...
... as long we put the CSS in the static folder!
If you followed along correctly, your page should now look like this:

The end!
Creating git repository: bonus exercises
-
Read
this article
to learn more about how to use a
.gitignorefile in your git repository! - If you haven't already, do Exercises 33, 34, 38 and 39 in the LPTHW e-book.
Go back
Flask: bonus exercises
If you're stuck on any of these exercises, this page is likely to contain the answers you're looking for!-
Write a function, then decorate it with an appropriate routing pattern,
so that when you visit
localhost:5000/whateverwith any value in the "whatever" part, it won't lead to an error page. -
Write a function, then decorate it with an appropriate routing pattern,
so that when you visit
localhost:5000/1/2, you can easily capture the sum of the two numbers after the first slash and return it onto the page.
More exercise Go back
3.* Modify the function in exercise 2, and adapting the simple HTML page we made earlier, return the answer with the HTML instead.
4. Write another function, decorate it with an almost identical routing pattern used
in exercise 2, so that it returns "Not a number" when you visit URLs with
non-numerical values after the first slash, like localhost:5000/p/2
More exercises Go back
5. Create another HTML page called error.html inside the templates folder.
Then, write a function with @app.errorhandler(404) above it so that when you visit
an unknown URL, your error.html is shown rather than Flask's
Not Found error page.
6.** If you've done the Beginners course, adapt the website you made for your competition such that the HTML, CSS and JavaScript files would load in correctly with Flask!
Go back