Session 6: Deploying your code
Sharing your app with the world

Where can I find the material?
You can find all the slides, links to the curriculum, and to the GitHub repository at:Recap: What is an API?
- A way which allows our Python code to access external services programmatically.
- Think of it as the "user interface" for our code to interact with a service!
- This interface allows our Python code to collect and process data from these services more easily.
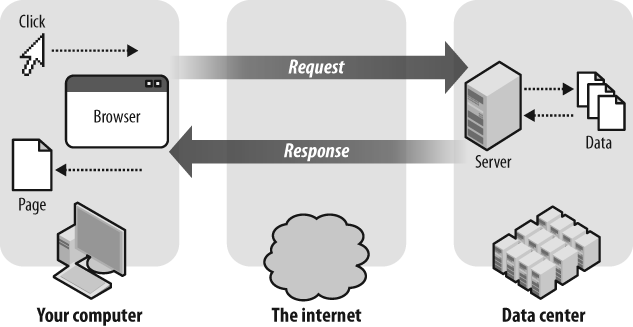
Recap: communicating with API in Python
We can do that either using:
- requests (HTTP for humans) with our chosen API, or;
- a Python library (like tweepy) which defines various functions that we can use in our code to access the API.
- Here's the familiar diagram again...
http://api.openweathermap.org/data/2.5/weather
Recap: API keys
- Used by most services that provide an API to identify who is accessing it.
- Authenticates our app and gives us permission to access the API accordingly.
- NEVER commit your keys on GitHub - it's the equivalent of giving away your passwords to everyone!
And now...
Let's move on to the course's final major topic: deployment!
Why should we upload (deploy) our app?
- Up until now, we've been working on and running the website locally on our laptops.
- This means the rest of the world won't be able to see the awesome work we have done!
- By deploying our code to a cloud-based platform (Heroku is the one we'll be using), our app will be assigned a publicly accessible URL that others can visit to see it!
What is Heroku?
- A cloud-based platform where we can push our code online to get our flask app up and running.
- Since one of the main purposes of computers on a cloud-based platform is to listen out to user requests at all times, it's on 24/7 unlike our laptops.
- Using Heroku also means that if our app becomes super popular, we can easily add more computing power to the platform our app runs on without the need to switch to a different one.
Hands on: deploying our first app to Heroku
Summary of changes to our local project
- create Procfile
- create requirenments.txt
- in our app `import os`
- in our app replace `app.run(debug=True)`
- commit and push our changes to github!
Config (environment) variables
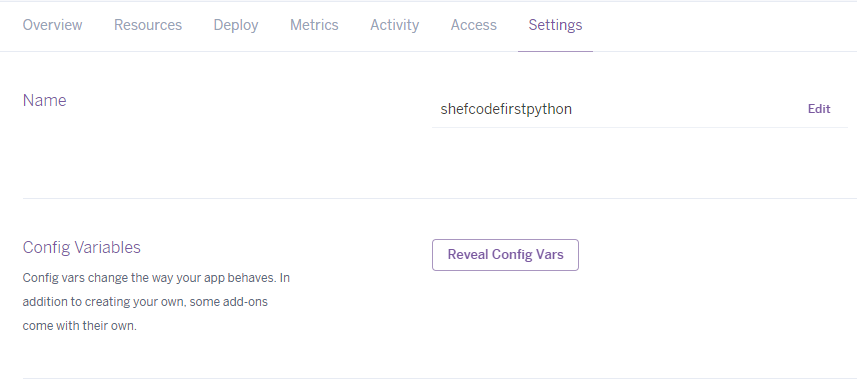
Instead of storing our API keys in a .env file, Heroku lets us store our API keys in config variables instead.
The values of these config variables can be set in our app on the Heroku website under Settings > Config Variables, then click the Reveal Config Vars button.
And here's how we'd access the values in our Python code:
Debugging our deployed app
When we develop our app locally on our laptops, we can normally trace any errors our app may have by looking at the terminal where we started up our Flask app.
The same set of errors may be accessed by clicking the More button at the top right of your app's dashboard. Then, select View logs in the dropdown.
 The dropdown menu to click to reach the error logs
 What the actual error logs look like